How to use Apache Druid for real-time analytics data storage
Apache Druid is a real-time high performance analytics data store for big data that makes running queries on large datasets faster. Here’s how to use it.

Apache Druid is described as a high performance real time analytics database and was developed at Metamarkets in 2011 for their internal analytics system. Unlike traditional relational databases, such as MySQL, Druid is a column-oriented data store and can “ingest” massive amounts of data and allows very fast querying, making it well-suited to large volumes of data (or “big data”), including time series or event-based datasets.
It’s really quick and can provide sub-second responses on datasets with billions of rows spanning terabytes of data, something you couldn’t easily do with a relational database. Like other Apache projects, Druid is free and open source and is used by many huge businesses, including Slack, Netflix, Cisco, and Airbnb.
Although it can be used with pretty much any data source or software applications, as it can handle data imported via batch processing or streaming, it is often used alongside Apache Hadoop and Apache Kafka for data ingestion (though these aren’t essential to use Druid), and alongside Apache Airflow for data orchestration (scheduling tasks to move or crunch data) and Apache Superset for data visualisation and reporting.
How does Druid work?
Druid is based on clustering so data is spread over different machines within the system. Internally, it has three different server types: Master, Query, and Data. The Master server coordinates things and handles tasks across the clusters, the Query servers identify which Data servers hold the data, then query it and serve the results, while the Data servers store and ingest data and respond to Query servers to provide their data when requested. Data servers can ingest data from almost anywhere - native batches within Druid, or from Kafka or Hadoop.
Like Apache Airflow and Apache Superset, Druid comes with its own web-based administration system to make it easier to interact with the system and control processes.
Master servers
Master servers handle Coordinator and Overlord processes. In Druid, data is split up into “segments” over a cluster and the Master server’s Coordinator process basically tracks and assigns data to these segments. Overlord processes coordinate how data is ingested for processing using Data servers. Despite the name, there are often many Master servers in Druid, as this ensures availability and reduces the likelihood of failure.
Query servers
Query servers handle Broker processes. These sit behind a load balancer which tracks processes and distributes tasks. The Broker process routes queries to the right Data server and then merges the results together. The nodes in the clusters may be physically separate machines.
Data servers
Data servers handle Historical and MiddleManager processes. These are quite cool. Historical processes serve data that has already been created or calculated, while MiddleManager processes receive data (in batches or in real-time) and then create segments using that incoming data.
Why would I want to use Druid?
The main reason for using Druid is because you want to run faster or real-time queries. If you ran a complex query on a large dataset using a relational database, such as MySQL, the query could take minutes to run, particularly if there’s a large dataset, lots of calculations or joins. Real-time queries provide much faster responses when querying large datasets, such as those containing lots of historical data. This means you can explore the data faster and more deeply than you could in a non-real-time system. It’s perfect for interactive dashboards and analytics platforms.
Does it have any disadvantages?
Yes, there are some disadvantages, but they may not all apply to your dataset. The first issue is with joins. You can’t join “large” tables together, but you can join multiple small ones together. This, of course, does depend on the definition of what “large” is - in Druid terms that’s measured in Petabytes, so it might not be a major issue for you. Secondly, Druid is designed for time-linked data, such as events which occur that a point in time, such as a web page view, or transaction, and it will partition data using this dimension.
Finally, when Druid ingests data it doesn’t modify the other data stored. For example, if you were feeding web analytics data into Druid, it would append these to existing data and wouldn’t change anything already stored. However, if you need to change historical data in Druid, you can just use the batch overwrite technique to recalculate the data and get Druid to re-ingest it, so it’s not the end of the world.
What are the main features of Druid?
Firsty, Druid is a column-oriented data storage system so queries on it run much faster than those on a row-oriented system, like a CSV file, as it can specifically query only the columns it needs to. Secondly, it’s highly scalable as it’s based on a clustering approach, so data can be spread over dozens, hundreds, or even thousands of servers, automatically, and it’s quick and resilient as a result. Finally, it can ingest data in both batches (such as file uploads or pre-crunched data pulled from other systems) or as streaming data (perhaps ingested from Apache Kafka). The combination of these features, and it’s massive speed of querying, makes it a powerful tool for data warehousing in analytics.
How does Druid store data?
As it’s a column-oriented data store, Druid uses a columnar file format. Each dimension or metric stored in Druid has its own column, which also get compressed and manipulated to speed up scanning and processing. For example, string columns get encoded as dictionaries instead of storing the whole value in each row. Although it’s called a columnar data store, it really stores data as arrays. Each column in a dataframe or table would be converted to its own array of values, so Druid can fetch the one it needs and parse it in double-quick time.
How do I get data into Druid?
Getting data into Druid requires “data ingestion”. This is basically just the process of moving data from one system to another, but it does require some thought and planning. It’s not a good idea to just copy everything over, as this is likely to lead to bloat and the storage of stuff you’re unlikely to require. You’ll want to cherrypick the columns you need.
The other important thing to remember with Druid is that it’s not a relational database management system (RDBMS). These favour normalization, so data only appears once in the database. However, Druid prefers denormalization, and it’s fine (and may be preferable) for the data to appear many times across the database. It’s way faster for Druid to retrieve the data than it is to perform a potentially massive join and look up the values from somewhere else. A flat database schema lets Druid work faster and more efficiently.
When moving data into Druid you’ll need to identify which columns you want to import, what data type they should be assigned, whether they represent a dimension or a metric, and whether you are going to “flatten” them or use Druid to normalize the data. If you’re regularly retrieving data based on a calculation, such as total revenue per day by channel, you may want to pre-calculate or “partially aggregate” the data and store this, as it will make it lightning fast to retrieve.
There are two main ways to get data into Druid via data ingestion: streaming (usually via Kafka) and Native Batch (via Druid itself). Unless you’re doing something particularly fancy, it’s probable that you’ll be using Native Batch most of the time.
What does Native Batch do in Druid?
Native Batch is the standard way of ingesting data from an external data source into Apache Druid. It involves the creation a file in Druid’s preferred format, so it can be converted to Druid’s data structure and split into segments across the Druid cluster.
The basic process involves creating an “ingestion spec” (written in JSON) which tells Druid where to find the data and what structure it’s in, and then passing it to an Overlord on a Master server. The Overlord system then passes it on to a MiddleManager on the Data server which splits it up and stores it in a such a way that it can be queried quickly when needed. Native Batches can be set up easily using the “Load data” tool in the Druid web interface.
Druid has quite a simplified approach to data types. You’re only really likely to require: long (a 64 bit signed integer), float (a 32 bit floating point number), double (a 64 bit double number), or string (a UTF-8 string). Each row stored requires a timestamps stored as long.
How do I query Druid?
Once you’ve got your data into Druid, you’ll want to extract it. This can be done using either a pure JSON API, or via SQL queries which are passed in JSON objects submitted over a REST API, with results returned in either CSV or JSON. Importantly, although Druid lets you use SQL to run queries, it uses its own SQL version and this doesn’t cover every feature of SQL, so you may need to adjust your queries so they work properly.
As Druid will fetch every column from a different cluster, you’ll want to ensure you define each column specifically instead of using SELECT * FROM. It can handle calculations and aggregations fine, so you can perform SUM(), COUNT(), and GROUPBY. It’s very powerful and very quick.
Installing Apache Druid

Install Docker Compose
As ever in data science DevOps, the easiest way to get up and running is to use a Docker image. There’s an official Apache Druid docker-compose.yml file available on Docker Hub (see below) which allows you to set up Apache Druid in Docker using Docker Compose. If you’re using Ubuntu, you can install Docker Compose using the following commands. On Ubuntu 20.04 this will install Docker Compose version 1.25.0-1.
sudo apt install docker-compose -y
Entering docker-compose --version will let you know that Docker Compose has been correctly installed.
Download the docker-compose.yml
Once you have Docker Compose installed, download the docker-compose.yml file from Apache Druid to your local machine. This will instruct Docker to create everything we need in a self-contained Linux container on your machine. The image uses PostgreSQL for storing its metadata and Apache Zookeeper for “distributed coordination”. It also configures the servers we mentioned earlier, including the Coordinator, the Historical, and MiddleManager.
Note that this is configured to run the Druid front-end on port 8888 of your localhost, which is the default for Jupyter, so you might want to change it to another port before bringing it up. To change it to run on port 8787 you can use - "8787:8888".
version: "2.2"

volumes:
  metadata_data: {}
  middle_var: {}
  historical_var: {}
  broker_var: {}
  coordinator_var: {}
  router_var: {}

services:
  postgres:
    container_name: postgres
    image: postgres:latest
    volumes:
      - metadata_data:/var/lib/postgresql/data
    environment:
      - POSTGRES_PASSWORD=FoolishPassword
      - POSTGRES_USER=druid
      - POSTGRES_DB=druid

# Need 3.5 or later for container nodes

  zookeeper:
    container_name: zookeeper
    image: zookeeper:3.5
    environment:
      - ZOO_MY_ID=1

  coordinator:
    image: apache/druid:0.17.0
    container_name: coordinator
    volumes:
      - ./storage:/opt/data
      - coordinator_var:/opt/druid/var
    depends_on:
      - zookeeper
      - postgres
    ports:
      - "8081:8081"
    command:
      - coordinator
    env_file:
      - environment

  broker:
    image: apache/druid:0.17.0
    container_name: broker
    volumes:
      - broker_var:/opt/druid/var
    depends_on:
      - zookeeper
      - postgres
      - coordinator
    ports:
      - "8082:8082"
    command:
      - broker
    env_file:
      - environment

  historical:
    image: apache/druid:0.17.0
    container_name: historical
    volumes:
      - ./storage:/opt/data
      - historical_var:/opt/druid/var
    depends_on:
      - zookeeper
      - postgres
      - coordinator
    ports:
      - "8083:8083"
    command:
      - historical
    env_file:
      - environment

  middlemanager:
    image: apache/druid:0.17.0
    container_name: middlemanager
    volumes:
      - ./storage:/opt/data
      - middle_var:/opt/druid/var
    depends_on:
      - zookeeper
      - postgres
      - coordinator
    ports:
      - "8091:8091"
    command:
      - middleManager
    env_file:
      - environment

  router:
    image: apache/druid:0.17.0
    container_name: router
    volumes:
      - router_var:/opt/druid/var
    depends_on:
      - zookeeper
      - postgres
      - coordinator
    ports:
      - "8888:8888"
    command:
      - router
    env_file:
      - environment
Configure your environmental variables
If you try to run docker-compose build or docker-compose up on the docker-compose.yml above, you’ll get an
error which says ERROR: Couldn't find env file. This is because the last line of the yml defines that Docker Compose should look for a file called environment containing the environmental variables Druid requires. You need to set this up to successfully build the container. Download a copy of the environment file to the directory containing your docker-compose.yml.
# Java tuning

DRUID_XMX=1g
DRUID_XMS=1g
DRUID_MAXNEWSIZE=250m
DRUID_NEWSIZE=250m
DRUID_MAXDIRECTMEMORYSIZE=6172m

druid_emitter_logging_logLevel=debug

druid_extensions_loadList=["druid-histogram", "druid-datasketches", "druid-lookups-cached-global", "postgresql-metadata-storage"]

druid_zk_service_host=zookeeper

druid_metadata_storage_host=
druid_metadata_storage_type=postgresql
druid_metadata_storage_connector_connectURI=jdbc:postgresql://postgres:5432/druid
druid_metadata_storage_connector_user=druid
druid_metadata_storage_connector_password=FoolishPassword

druid_coordinator_balancer_strategy=cachingCost

druid_indexer_runner_javaOptsArray=["-server", "-Xmx1g", "-Xms1g", "-XX:MaxDirectMemorySize=3g", "-Duser.timezone=UTC", "-Dfile.encoding=UTF-8", "-Djava.util.logging.manager=org.apache.logging.log4j.jul.LogManager"]
druid_indexer_fork_property_druid_processing_buffer_sizeBytes=268435456

druid_storage_type=local
druid_storage_storageDirectory=/opt/data/segments
druid_indexer_logs_type=file
druid_indexer_logs_directory=/opt/data/indexing-logs

druid_processing_numThreads=2
druid_processing_numMergeBuffers=2

DRUID_LOG4J=<?xml version="1.0" encoding="UTF-8" ?><Configuration status="WARN"><Appenders><Console name="Console" target="SYSTEM_OUT"><PatternLayout pattern="%d{ISO8601} %p [%t] %c - %m%n"/></Console></Appenders><Loggers><Root level="info"><AppenderRef ref="Console"/></Root><Logger name="org.apache.druid.jetty.RequestLog" additivity="false" level="DEBUG"><AppenderRef ref="Console"/></Logger></Loggers></Configuration>
Build the Druid Docker container
Once you’ve got both the docker-compose.yml and the environment file in your preferred location on your machine you can use Docker Compose to build the container. As there’s quite a bit to this container, expect this to take a few minutes to download and build.
docker-compose up
Launching your Apache Druid cluster
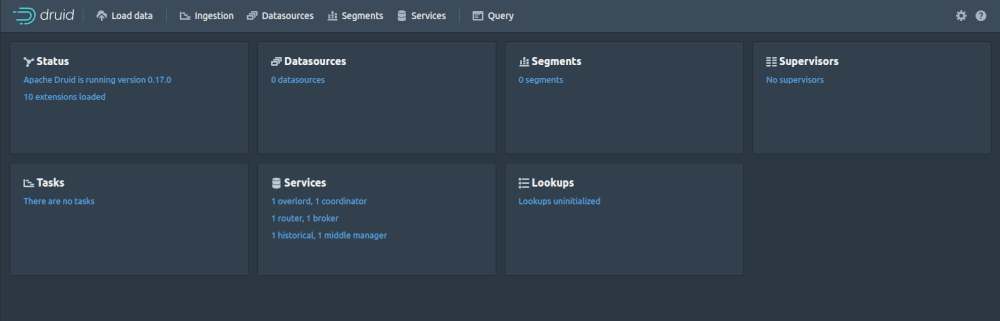
To start up your Apache Druid cluster on Docker you can enter docker-compose up or docker-compose up -d if you want to run it in the background. Unless you changed the port, Druid should be running at http://localhost:8888. If it clashes with Jupyter, you’ll need to edit the yml file, as otherwise Druid will fail to start the router component used to serve the website.
Importing data into Druid
You can import data into Druid from a wide range of different sources. Some of these are preconfigured out-of-the-box, while others require an extension to be loaded to turn on a service. The standard data sources you can ingest data from are: Apache Kafka, Amazon Kinesis, Amazon S3, Google Cloud Storage, and the Hadoop Distributed File System (HDFS). You can also access data via HTTP, upload it from your local disk, paste it in directly, or create your own custom source by creating a JSON source or supervisor spec.
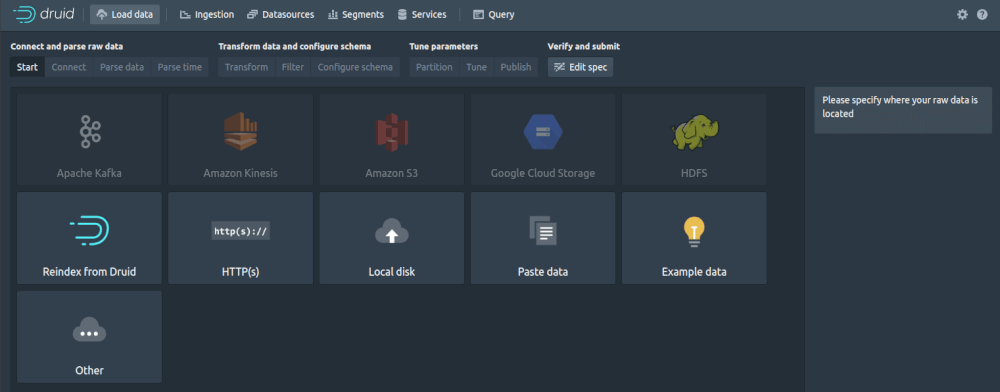
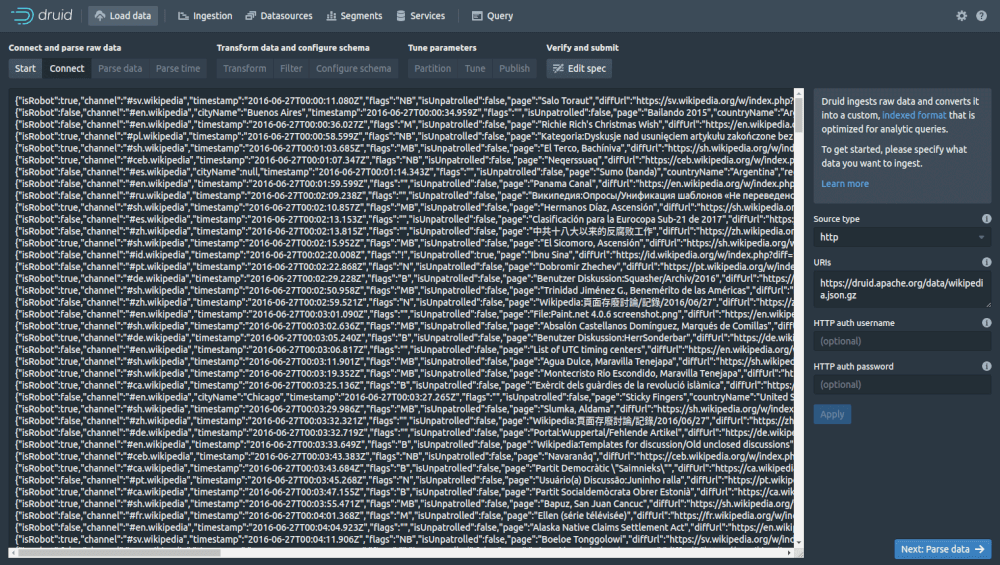
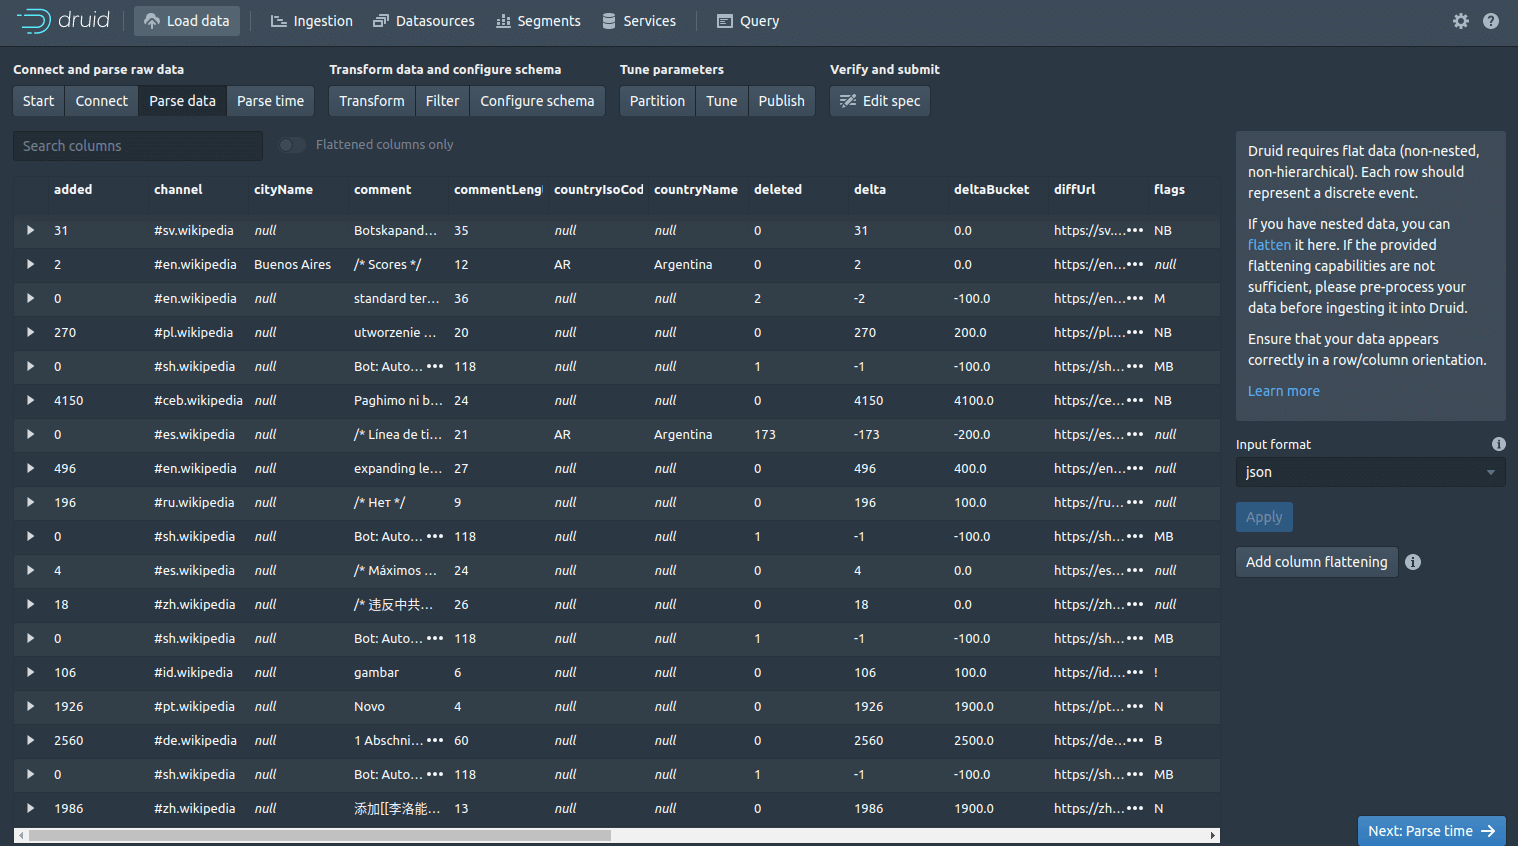
To get a basic idea of what’s involved, go to “Load data” and then select “Example data” and “Load example.” You’ll be shown the JSON data from Wikipedia that Druid is going to import. Click “Parse data” to instruct Druid to parse the JSON and convert it into a dataframe.
Druid will now parse the JSON data and convert it into a table or dataframe. Next, click “Parse time”.
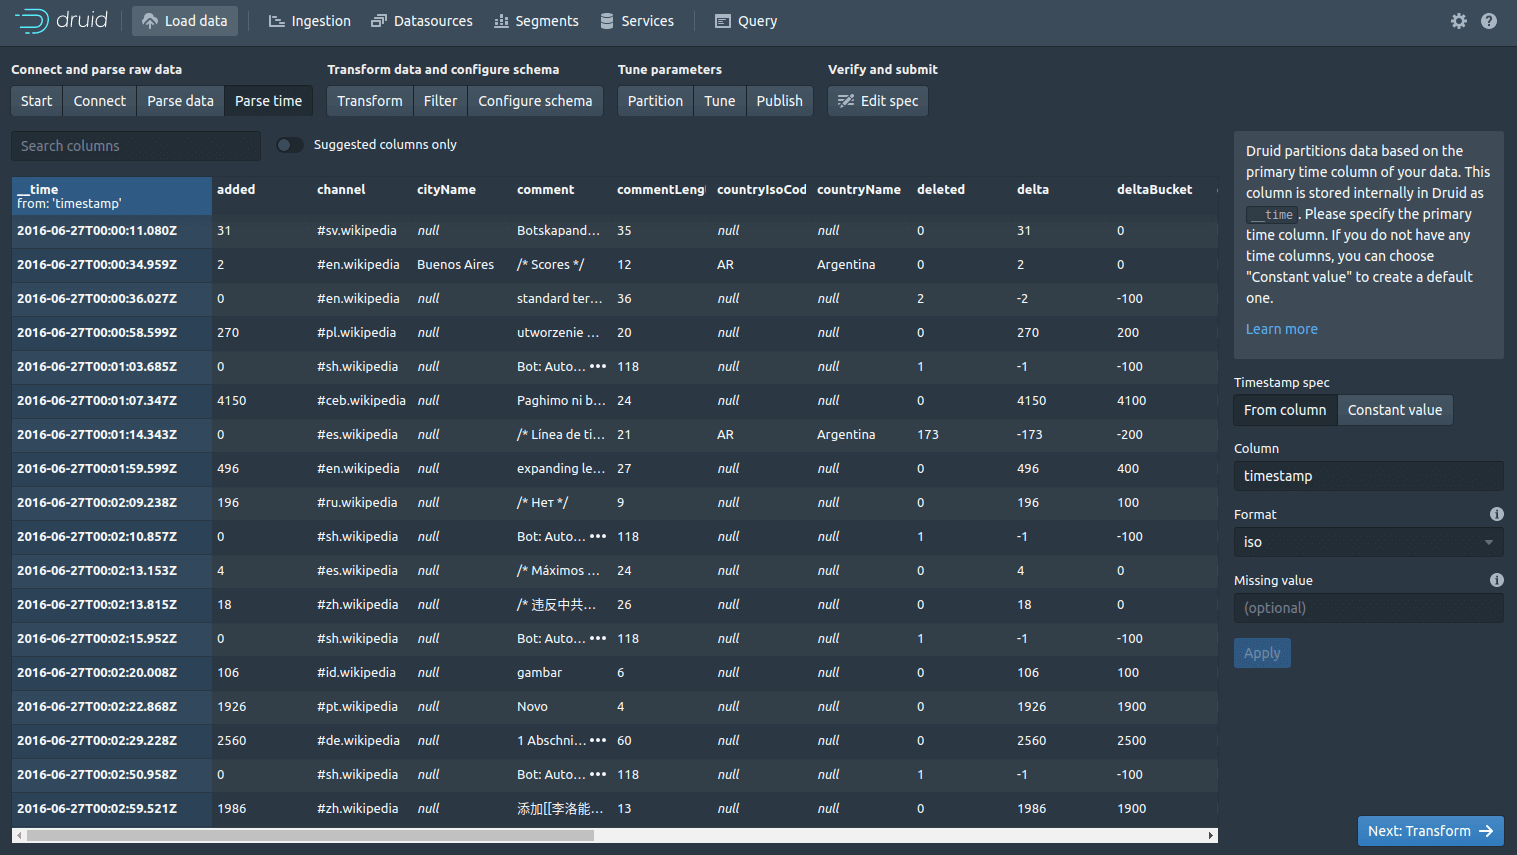
Druid partitions the data used a time column which gets stored internally in a column called __time. If your data doesn’t include a time column, don’t worry, you can still import it by selecting the “Constant value” button.
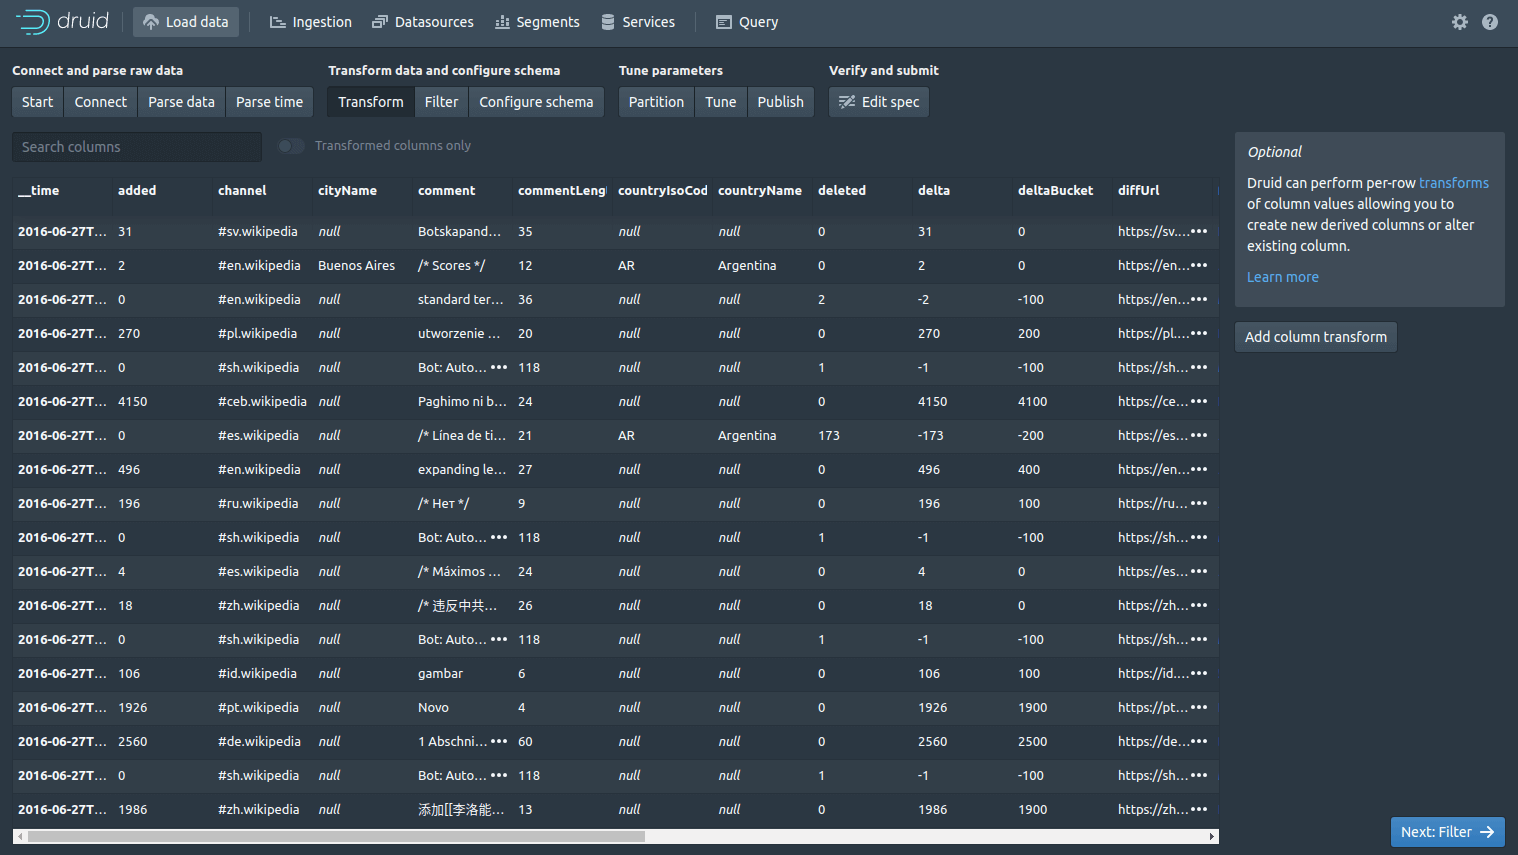
The Filter screen lets you apply global or column-based filters so you can remove or filter-out any data you don’t want, directly within Druid. From the “Parse time” screen, click the “Transform” button. This allows you to define custom row-based transformations, so you can create new columns on those present in the data, or you can alter existing ones.
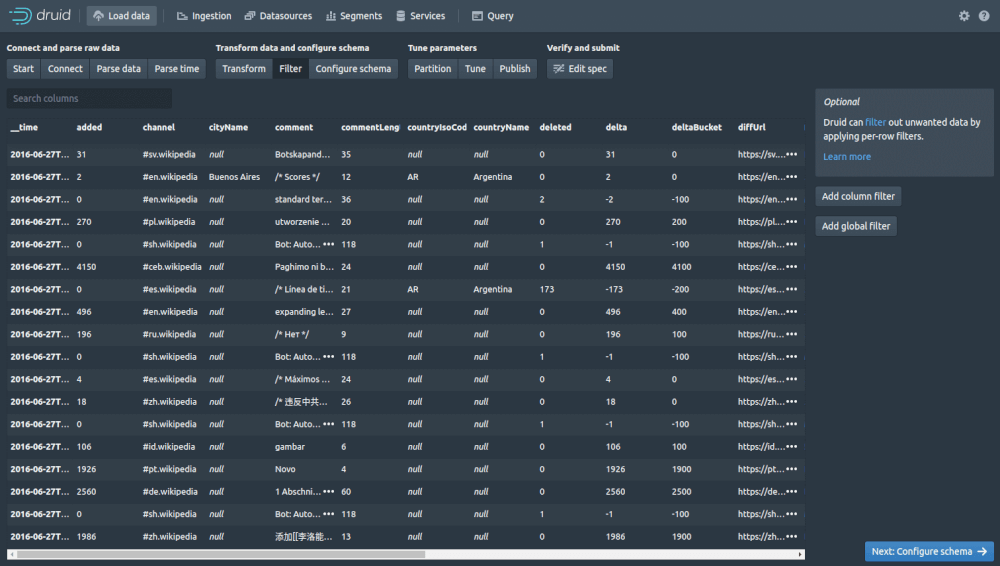
The Filter screen lets you apply global or column-based filters so you can remove or filter-out any data you don’t want, directly within Druid. Next click “Configure schema”.
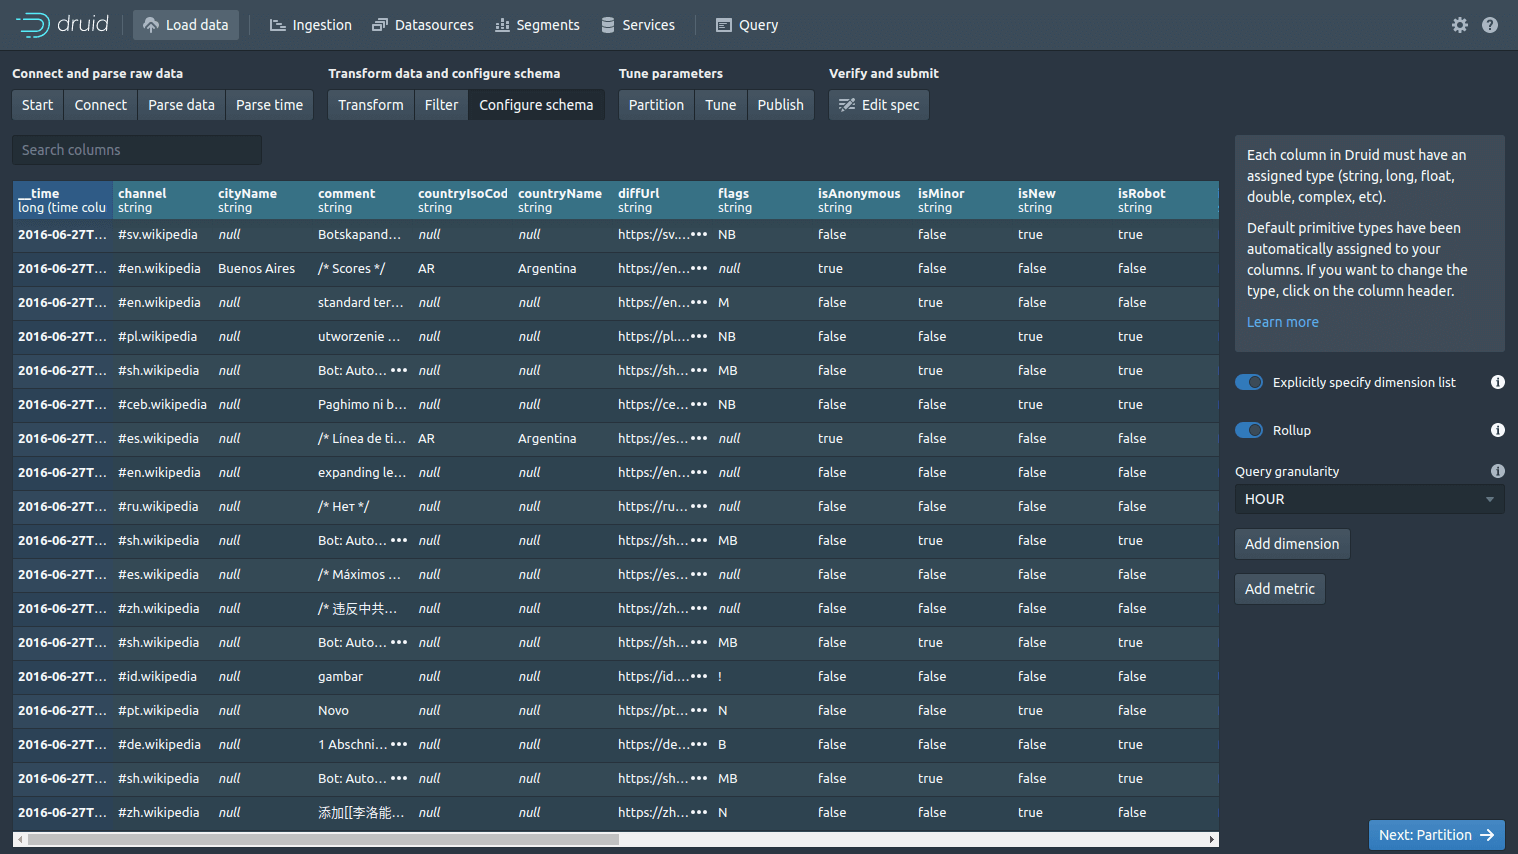
The Configure schema lets you make any adjustments to your schema. If you want to change the column names or adjust the data types, you can do it easily here. There’s also a handy “Rollup” option here. If you enable this, Druid will try and pre-aggregate data before it is indexed to try and save space. To use this, you will need to label each column as either dimension or metric. Next click “Partition”.
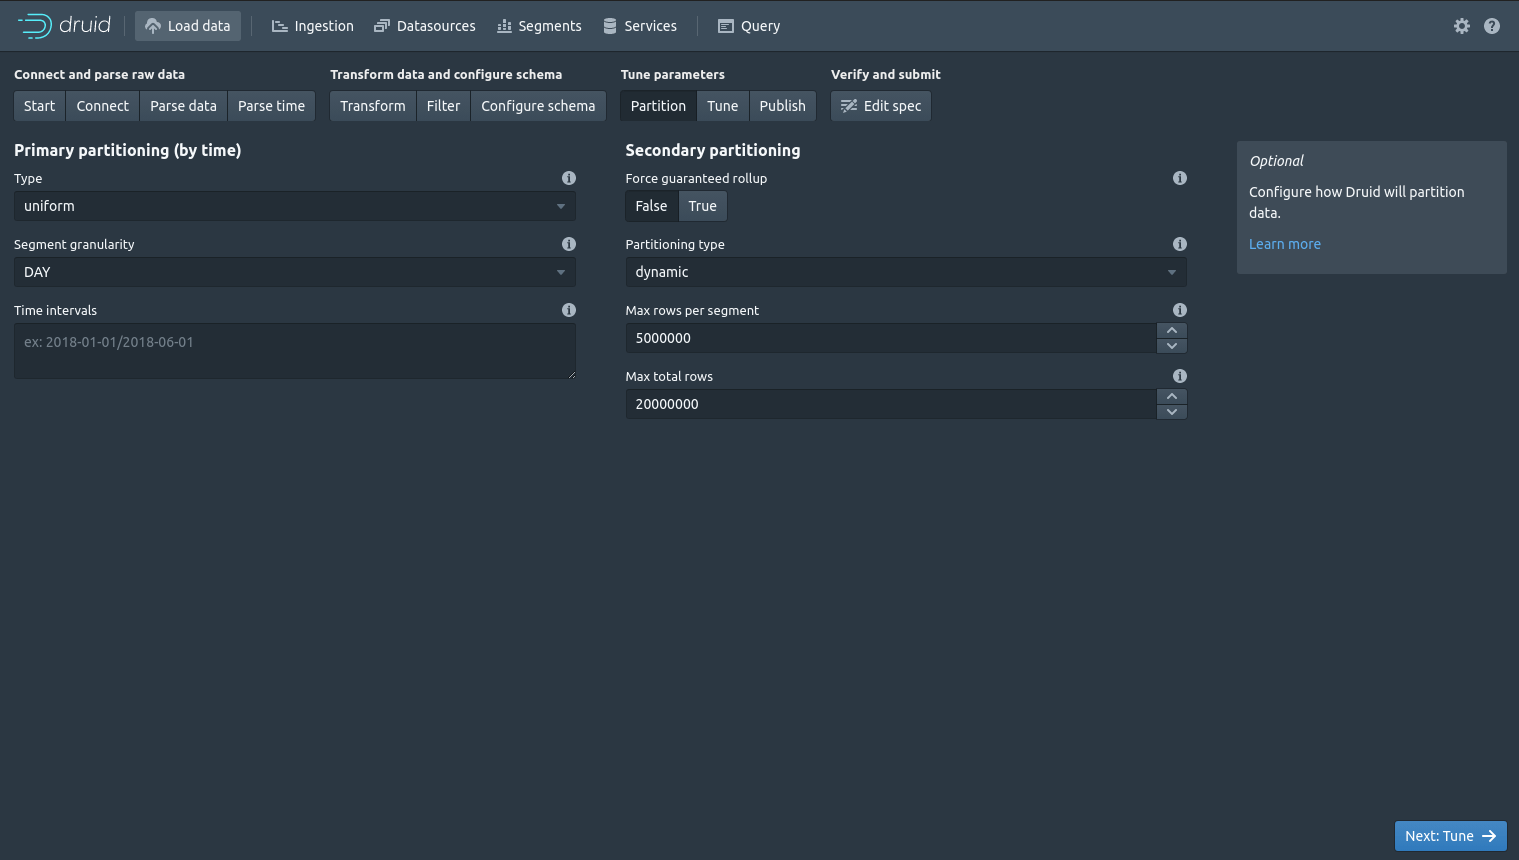
The Partition screen lets you control how Druid partitions your data. You can set the granularity of the time-based data (i.e. hour, day, week, month, year), and provide other technical parameters for partitioning. Next click “Tune”.
The Tune screen fine tunes how Druid ingests its data. It covers things like timeouts, retries, caching and memory allocation. Penultimately, click “Publish”.

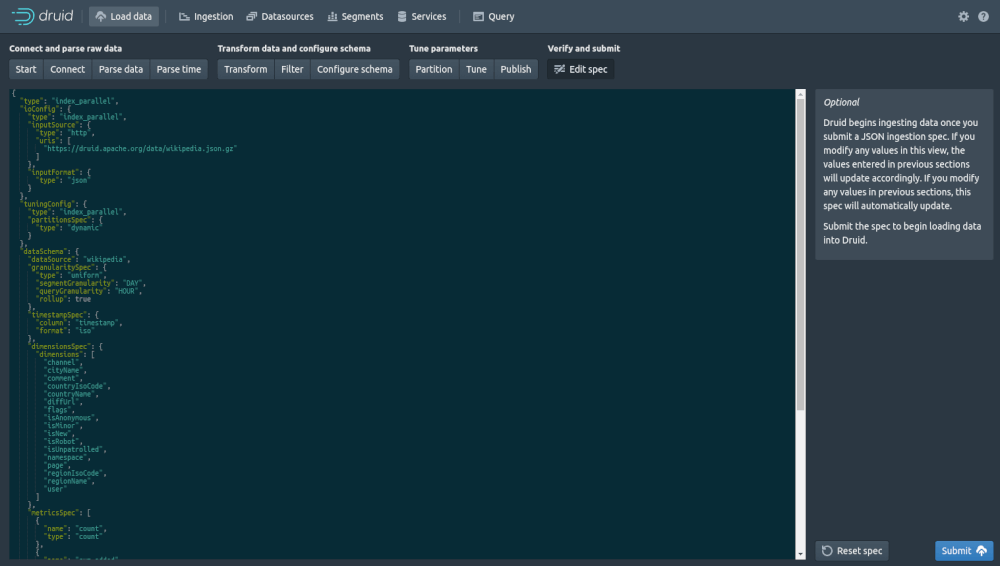
The Publish screen lets you define the name for the data source and whether it should append or not. Finally, you can click “Edit spec” to view the specification JSON and “Submit” to save it.
Matt Clarke, Wednesday, March 03, 2021


Other posts you might like

How to Dockerize a data science application
The phrase “It works on my machine” is a common one in most offices with a data science department. It’s very common to write an application that works perfectly in...

How to backup a MySQL database using mysqldump, SSH and SCP
If you need to create a backup of a remote MySQL database, you can use the mysqldump command. The mysqldump application is known as a client utility and installed alongside...