How to create ecommerce data pipelines in Apache Airflow
Learn how to create an Apache Airflow data pipeline and see why it is one of the most widely used ETL tools for scheduling, running, and monitoring data science tasks.

Like Apache Superset, Apache Airflow was developed by the engineering team at Airbnb and was open sourced in 2014. It’s a Python-based platform designed to make it easier to create, schedule, and monitor data “workflows”, such as those in ETL (Extract Transform Load) jobs, and is similar to Oozie and Azkaban. A workflow or data pipeline is basically a series of tasks which run in a specific order to fetch data from various systems or perform various operations so it can be used by other systems.
In Airflow, workflows are written in Python code, which means they’re easier to read, easier to test and maintain, and can be kept in version control, rather than in a database. The workflows are known as Directed Acyclic Graphs, or DAGs for short, and they make life a lot easier for data engineers.
Not only are DAGs logical and relatively straightforward to write, they also let you use Airflow’s built in monitoring tools and can alert you when they’ve run or when they’ve failed, which the old-school Cron task approach doesn’t do. They can also support dependencies, so if one workflow depends on the presence of data from another, it won’t run until it’s present.
Here we’re going to install Apache Airflow, build a simple DAG, and make the data available to Apache Superset so it can be used to create a custom ecommerce business intelligence dashboard.
Install the Airflow Docker container
As with Superset, Airflow can be installed as a Python package from PyPi. However, most companies who run Airflow are likely to do so via Docker, so we’ll follow this approach. It also means there’s far less configuration required to get Airflow up and running. Various Airflow Docker containers exist, including an official one, but the most widely used is from a user called Puckel, which has had over 10 million downloads.

To pull the Puckel Docker container for Airflow open up your terminal and enter the below command. This will fetch the latest version and install it on your machine so you can configure it.
docker pull puckel/docker-airflow
Set up a volume and run the Airflow container
In order for Airflow to access the DAGs you will need to set up a volume. This basically just maps a local directory on your machine to a directory on the Docker container running Airflow. It means you can use the Docker container solely for serving Airflow, with all the important data stored under version control on your local machine. I’ll create a folder for DAGs on my machine and then map it to /usr/local/airflow/dags on the container using the below commands.
This will create a Docker container for Airflow called docker_airflow which will run the Airflow webserver on port 8080, with the dags directory on the container linked to the one in my home directory.
mkdir /home/matt/Development/DAGs
docker run --name docker_airflow -d -p 8080:8080 -v /home/matt/Development/DAGs:/usr/local/airflow/dags puckel/docker-airflow webserver
Run the Airflow container
Next, point your web browser to http://localhost:8080/admin and you should see the Airflow webserver. You’ve now got a named Docker container set up for Airflow that you can start whenever you need it.

Creating Directed Acyclic Graphs
As I mentioned earlier, Airflow is based around the concept of Directed Acyclic Graphs or DAGs. Although they sound really complicated, DAGs can basically be thought of as workflows consisting of one or more tasks that have a start point and an end point. By breaking down each DAG into precise steps, it’s easier to understand what they do, how long each step takes, and figure out why a step may not have run. Since DAGs are based on Python scripts they can be kept under version control and are easy to read, and they automate any computational process you can run in Python or Bash. To see how DAGs work, let’s start with a really basic example.
Import the packages and modules
A DAG is basically a definition file that tells Airflow what task to perform. The first step to creating a DAG is to create a Python script and import Airflow and the Airflow operators and other Python packages and modules you need to run the script. We’ll import DAG and the PythonOperator and BashOperator from operators so we can run both Python and Bash code.
from airflow import DAG
from airflow.operators.python_operator import PythonOperator
from airflow.operators.bash_operator import BashOperator
from datetime import datetime
from time import sleep
Define your default arguments
Next, we’ll define our “default arguments” in a Python dictionary. These tell Airflow how to handle the DAG and allow you to define its dependencies, and tell it what to do if the task fails. I’ve defined airflow as the owner and set my DAG to email me if it fails and try three times, with a gap of five minutes between retries. There are loads of options you can use. Check out the Airflow documentation for more details.
default_args = {
    'owner': 'airflow',
    'email': ['matt@flyandlure.org'],
    'email_on_failure': True,
    'email_on_retry': True,
    'retries': 3,
    'retry_delay': timedelta(minutes=5)
}
Configure your DAG
Now we will instantiate a new DAG. We’ll set the dag_id to example_dag, set the start_date and configure the schedule. The Airflow scheduler can handle various time formats, such as @hourly and @daily, or standard Cron syntax.
dag = DAG(
    dag_id = 'example_dag',
    start_date = datetime(2020,9,10),
    schedule_interval = '@hourly',
    default_args=default_args
)
Create the DAG tasks
Finally, we will create the DAG tasks. In Airflow, each task is controlled by an operator. Operators usually run independently and don’t share information, so you’ll need separate ones for each step in your process. Here we’re using the PythonOperator() which runs Python code, but there’s also a BashOperator(), a MySQLOperator, an EmailOperator(), and various other operators for running different types of code. You can also write your own.
For simplicity, task1() and task2() just return a string, but they could run a SQL query and save the output, crunch some data, start a model, scrape a website, or perform pretty much any task you can think of. We give each task an ID, set it to call the appropriate function and tell it to run against the dag we created above. I’ve added a sleep() to each function so execution is delayed to simulate what might happen with a database query.
def task1():
    sleep(10)
    return "This is task 1"

def task2():
    sleep(30)
    return "This is task 2"

task1 = PythonOperator(
    task_id = 'task1',
    python_callable = task1,
    dag = dag
)

task2 = PythonOperator(
    task_id = 'task2',
    python_callable = task2,
    dag = dag
)
The very last step is to define the order in which the tasks in the DAG should be run. Simply separate the tasks and order them chronologically and Airflow will run them in sequence. Once you’re done, save the Python file to your DAGs directory and go to the Airflow webserver. The » or Bitshift operator defines whether a sequence is upstream (before) or downstream (after). This tells Airflow that task2 should not be run until task1 has completed.
task1 >> task2
Turn on your DAG
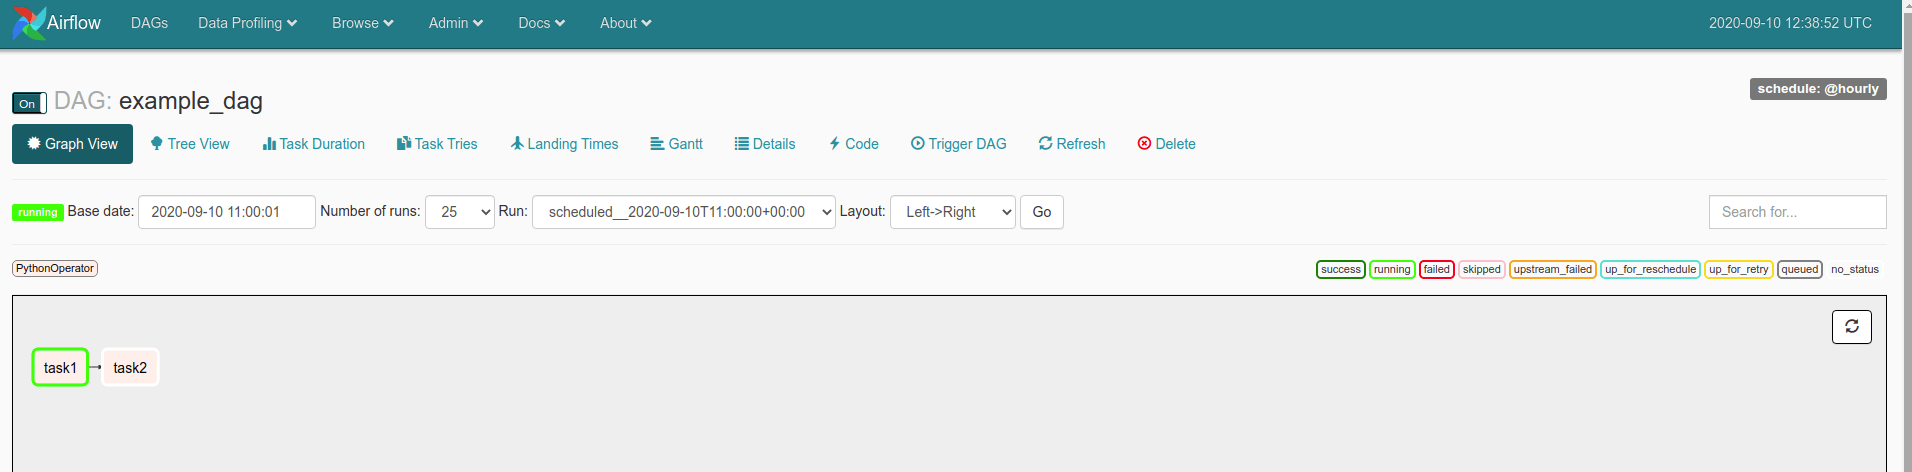
Open up the Airflow webserver at http://localhost:8080/admin and find your DAG. At the top left-hand corner of the page you’ll see a switch marked “Off”. Slide this to the “On” position to enable your DAG. You should see a sequence of task events shown below. These are coloured according to their status. If a task within a DAG fails you can click it to view the logs and identify exactly what happened, fix the issue and then re-start the task and continue processing.
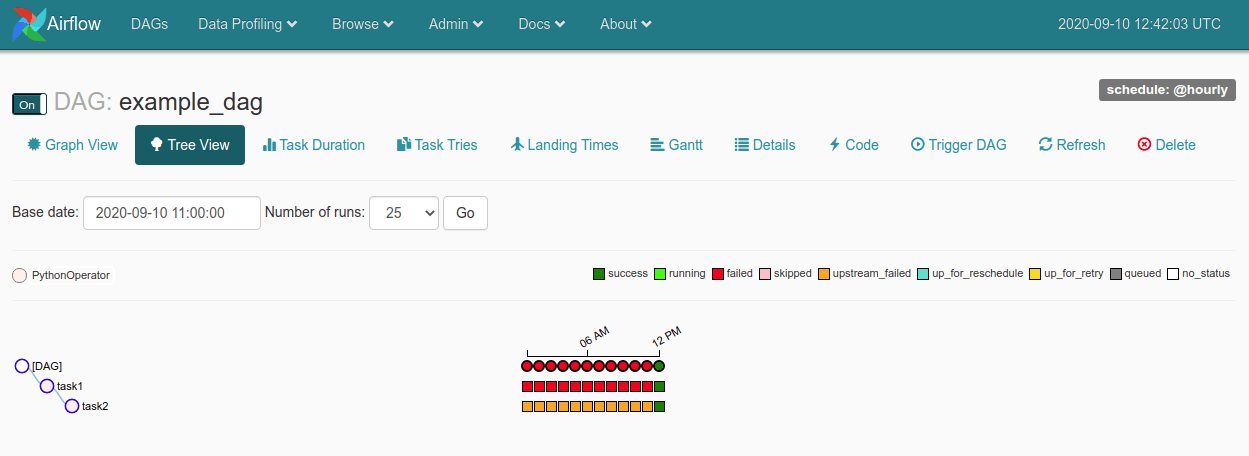
The Tree View tab provides detailed historic data on the tasks in your DAG, so you can check they’re running and investigate any issues that may have arisen. Hovering over the coloured dots gives you a tooltip containing more granular data on each event.
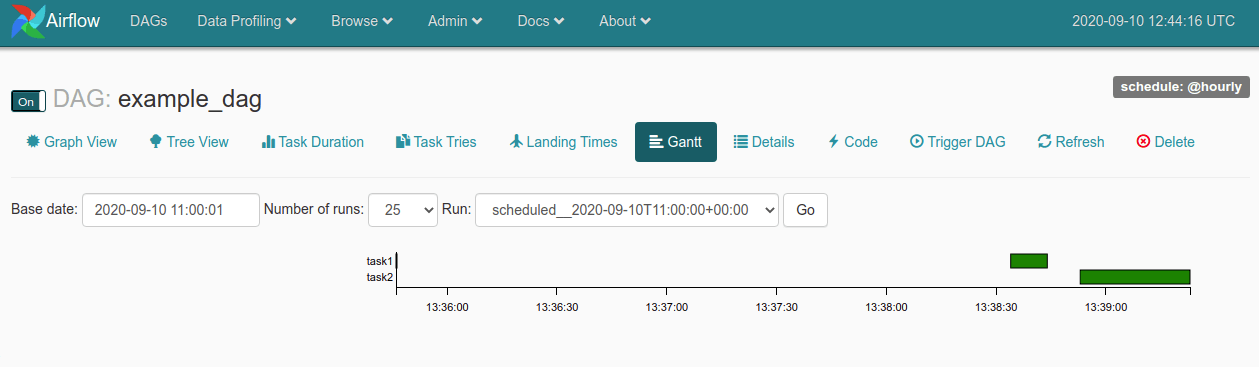
The Gantt tab is particularly useful. With other systems it can be challenging to work out where bottlenecks lie, but Airflow provides a Gantt chart showing the timings of each task in the DAG, which lets you see exactly which parts of your task take the longest to run, so you can optimise the queries or processes to speed things up.
Obviously, this is a really simple example, but the approach can easily be adapted to run far more sophisticated processes automatically. Next, let’s create a DAG to connect to MySQL, pre-calculate some data and store the results in a database, so we can use it in an Apache Superset dashboard.
Creating an ecommerce data pipeline
A typical use case for Apache Airflow would be the creation of an ecommerce data pipeline or ETL job. This uses the Extract, Transform, Load methodology to extract data from one database, transform the data, and then load it into another system. It’s the common way that data is taken from production systems, manipulated and enriched, and then pushed back into another system for analysis. Airflow makes the ETL process much simpler to create and easier for others to follow.
Create your connections
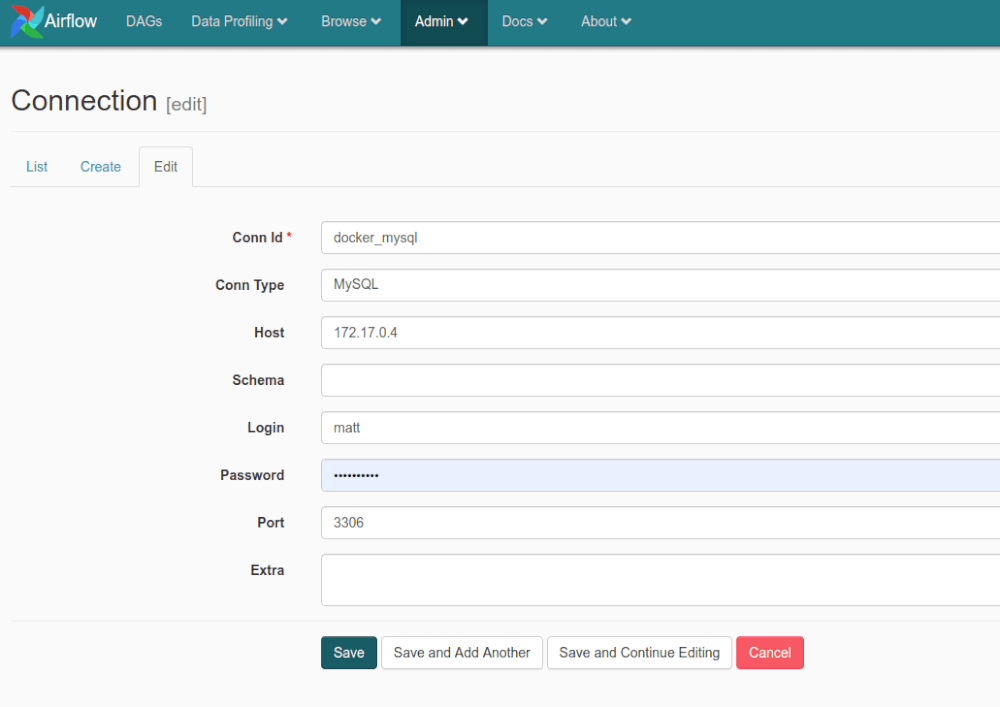
In order to access your data you need to configure one or more connections in Airflow. The connections are pretty simple to configure, just go to Connections, click Create, enter the details and then save them. I’m running MySQL in another Docker container, so I’m going to create one connection to this and then define the schema I connect to in my queries. This will allow me to move data between databases using a single connection, so my orchestration will extract from one database, transform the data, then load it into another database.
Create your SQL queries
My DAG is going to extract data by querying an ecommerce transactional database, transform the data by calculating the current number of orders and total spend for each customer in the database, and then load this in a separate database. While this example uses MySQL to MySQL, you could have any combination of steps. Perhaps extracting from MySQL, manipulating in Python using Pandas, running a model using Sci-Kit Learn, and then inserting the data into a Postgres database.
Before writing your DAG tasks, I’d recommend writing your SQL queries and checking them over carefully to ensure they provide accurate results and are efficient to run. I’ve created a simple table on my airflow MySQL database called customer_metrics which is going to hold my data using the query below.
CREATE TABLE customer_metrics (
    customer_id INT,
    total_orders INT,
    total_revenue DECIMAL(10,2),
    PRIMARY KEY (customer_id)
);
Next, I’ve written a SELECT statement which fetches the distinct customers from the orders table, counts the number of unique orders they’ve placed, sums the total amount spent, groups the data by the customer ID and excludes any records without a customer ID.
SELECT
    DISTINCT(shoporders.customerid) AS customer_id,
    COUNT(DISTINCT(shoporders.id)) AS total_orders,
    SUM(shoporders.ordertotal) AS total_revenue
FROM shoporders
WHERE shoporders.customerid NOT LIKE 0
GROUP BY shoporders.customerid;
I’ve adapted the above query to INSERT the data into airflow.customer_metrics after running the SELECT query on ecommerce.shoporders. That runs the query and transfers data from one database to the other.
INSERT INTO airflow.customer_metrics (
    customer_id,
    total_orders,
    total_revenue
)
SELECT
    DISTINCT(ecommerce.shoporders.customerid) AS customer_id,
    COUNT(DISTINCT(ecommerce.shoporders.id)) AS total_orders,
    SUM(ecommerce.shoporders.ordertotal) AS total_revenue
FROM
    ecommerce.shoporders
WHERE
    ecommerce.shoporders.customerid NOT LIKE 0
GROUP BY
    ecommerce.shoporders.customerid;
Since these data change on a daily basis, I need to ensure I empty the airflow.customer_metrics table using TRUNCATE before inserting the data.
TRUNCATE TABLE airflow.customer_metrics;
Create your DAG
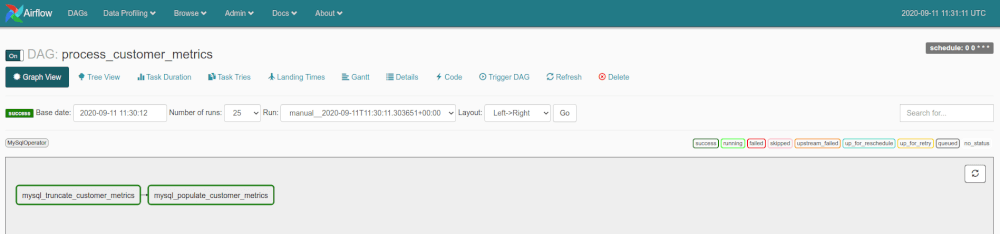
In my DAGs directory I’ve added a subdirectory called sql into which I have saved the TRUNCATE and INSERT queries as the text files mysql_truncate_customer_metrics.sql and mysql_populate_customer_metrics.sql. Then I created a DAG called process_customer_metrics.py with the code below. This includes two steps: the first one mysql_truncate_customer_metrics truncates the existing customer_metrics table on the airflow database, while the second one mysql_populate_customer_metrics selects from ecommerce.shoporders, performs some calculations, and inserts into airflow.customer_metrics.
from airflow import DAG
from airflow.operators.mysql_operator import MySqlOperator
from datetime import datetime, timedelta

default_args = {
    'owner': 'airflow',
    'retries': 3,
    'retry_delay': timedelta(minutes=5)
}

dag = DAG(
    dag_id = 'process_customer_metrics',
    start_date = datetime(2020,9,11),
    schedule_interval = '0 0 * * *',
    default_args=default_args
)

# Truncate customer metrics table

mysql_truncate_customer_metrics = MySqlOperator(
    dag=dag,
    mysql_conn_id='docker_mysql',
    task_id='mysql_truncate_customer_metrics',
    sql='sql/mysql_truncate_customer_metrics.sql'
)

# Populate customer metrics table

mysql_populate_customer_metrics = MySqlOperator(
    dag=dag,
    mysql_conn_id='docker_mysql',
    task_id='mysql_populate_customer_metrics',
    sql='sql/mysql_populate_customer_metrics.sql'
)

mysql_truncate_customer_metrics >> mysql_populate_customer_metrics
To run the DAG manually click the DAG and then click Trigger DAG. After it’s run you should see the tasks turn green in the Graph View. If your task has failed, click the View Logs button and check why. One common reason is that the credentials have been lost. See this documentation on setting up a Fernet keyto persist your database credentials.
Matt Clarke, Wednesday, March 03, 2021


Other posts you might like
How to Dockerize a data science application
The phrase “It works on my machine” is a common one in most offices with a data science department. It’s very common to write an application that works perfectly in...

How to backup a MySQL database using mysqldump, SSH and SCP
If you need to create a backup of a remote MySQL database, you can use the mysqldump command. The mysqldump application is known as a client utility and installed alongside...