How to build a data science workstation
Building your own data science workstation or deep learning workstation isn’t that difficult and can save you a small fortune. Here’s how I built mine.
If you’re working in data science, and especially if you’re working in deep learning, you’re going to need a decent workstation in order to be productive. Earlier this year I upgraded my work machine to a new off-the-shelf data science workstation from Scan’s 3XS range.
It made a huge difference to what I could do and greatly reduced waiting times. Since I also do a lot of extra-curricular data science at home, I wanted to build a machine that was as capable as the one I used at work. Here’s how I built it.
My off-the-shelf data science workstation
My work machine is the bottom of the range model from Scan’s 3XS Deep Learning Workstation range. The 3XS range my workstation came from includes other machines that go up to around £32,000 in price.
Mine came pre-installed with Ubuntu 18.04, the CUDA and CuDNN drivers, and NVIDIA Docker, so was ready to use straight away. It cost around £2200 to purchase pre-built. The parts inside were worth around £1955, so there’s a saving to be made if you can build your own.
Components list
The Scan 3XS Deep Learning Workstations include very high quality and expensive components, which pushes up their prices. There’s an Intel i7 9700K CPU at the heart, plus a fast NVME2 SSD, 32 GB of fast memory, and an expensive and, what was, a pretty much top-of-the-range GPU.
| Component | Model | Price (approx.) |
| Motherboard | ATX Strix Z390-F gaming | £210 |
| CPU | Intel Core i7 9700K | £340 |
| Cooler | BeQuiet! Dark Rock | £77 |
| RAM | Corsair 32GB | £120 |
| Storage | 970 EvoPlus 1TB NVME2 | £77 |
| Storage | 2TB hard drive | £65 |
| GPU | Gigabyte GeForce RTX 2080 Super | £740 |
| Case | Fractal Design Define 7 | £97 |
| PSU | TX550M 550W PSU | £80 |
| £1955 |
My self-built data science workstation
My aim was to build something comparable to the 3XS Deep Learning Workstation to use at home, ideally for a fraction of the cost. As I already had an older workstation, I was able to transfer a few components out of that (a couple of SSDs and a couple of 1.5TB hard drives) to top up the storage capacity, so that helped cut costs.
Components list
I went with an AMD Ryzen 7 CPU instead of the more expensive Intel Core i7. This offered much more bang-for-buck. I paired that with a Micro ATX B450M motherboard and increased the RAM from 32 GB to 64 GB. I used a smaller, but faster NVME2 boot drive, and dropped in the spare drives from my previous machine to boost the storage space. I also cut costs by using a less expensive RTX 2060 GPU.
| Component | Model | Price (approx.) |
| Motherboard | Microstar Mortar Max B450M mATX | £71 |
| CPU | AMD Ryzen 7 3700X | £270 |
| Cooler | Alpenfohn Brocken 2 140 mm | £25 |
| RAM | HyperX Fury 3200 MHz DDR4 16 GB x 4 | £280 |
| Storage | ADATA XPG SX8200 512 GB NVME2 | £80 |
| Storage | 2 x 256 GB SSDs | Nil |
| Storage | 2 x 1.5 TB HDDs | Nil |
| GPU | NVIDIA GeForce RTX 2060 | £320 |
| Case | Thermaltake Core v21 mATX case | £48 |
| PSU | Corsair VS550 550W PSU | £72 |
| Cooling | BeQuiet! Pure Wings 2 120 mm x 4 | £45 |
| £1211 |
Building the workstation
The workstation was fairly easy to build. The Thermaltake Core v21 case I selected proved a good choice, offering tons of internal space for components, and allowing enough space for four additional fans to allow me to overclock the CPU and keep it cool.
I did encounter some hardware compatibility issues. My first motherboard wasn’t capable of running my newer Ryzen 3700X, so I had to swap that for a later model. I also made the mistake of purchasing the CPU with the Wraith Prism cooler. I found this was a little noisy and wasn’t sufficient for overclocking, so I upgraded to the Alpenfohn Brocken 2.
Selecting the right GPU
I spent some time searching for the right GPU or graphics card. As I do GPU-accelerated work in TensorFlow and RAPIDs I needed an NVIDIA GPU, so I could run the CUDA and CuDNN libraries required.
I considered quite a few different GPUs, including second-hand Nvidia Tesla cards, which had been popping up on eBay for a few hundred pounds - despite having cost £5K plus a few years ago. However, despite the low price, they require custom cooling solutions and don’t pack as many CUDA cores as later NVIDIA consumer cards.
I initially opted for a pair of secondhand NVIDIA GeForce GTX 690 graphics cards, which packed a huge 6000 CUDA cores between them for a total price of £250. However, I struggled to get them working properly, so swapped them for the RTX 2060. This has 1920 CUDA cores and 250 Tensor Cores, so delivers about 52 teraflops of compute power.
If you’re running the NVIDIA Data Science Stack, you’ll need an NVIDIA GPU based on the Pascal, Volta, or Turing architecture. This includes Quadro P, GV and RTX cards; Tesla P, V, and T models; and GeForce 10xx and 20xx GPUs. I would imagine Ampere support is coming, if it’s not already present.
Data science software set-up
Linux, specifically Ubuntu, tends to be the most commonly used operating system among data scientists, so I’ve gone with this. I used the new ZFS filesystem feature to allow me to create a Zpool of RAID-like storage using the spare drives I installed from my previous machine. This also allows me to create snapshots and roll back to previous versions of my set up if I need to.
To speed up software installations I made a script, so I could re-install or replicate my install on my laptop or work machine. Installation was easy. The only difficult bit was setting up the Nvidia drivers, CUDA, and CuDNN, which I think is a common issue for most people.
Rather than doing this manually, I’d recommend you instead try the new NVIDIA Data Science Stack, which handles the installation and configuration of everything for you!
Performance comparisons
The self-built Ryzen 7 3700X workstation performed very well indeed, especially given the much lower cost. I used Geekbench 5 to compare its performance to my original workstation (an ageing Intel Core i5 with 16GB RAM) and the Scan 3XS Deep Learning Workstation.
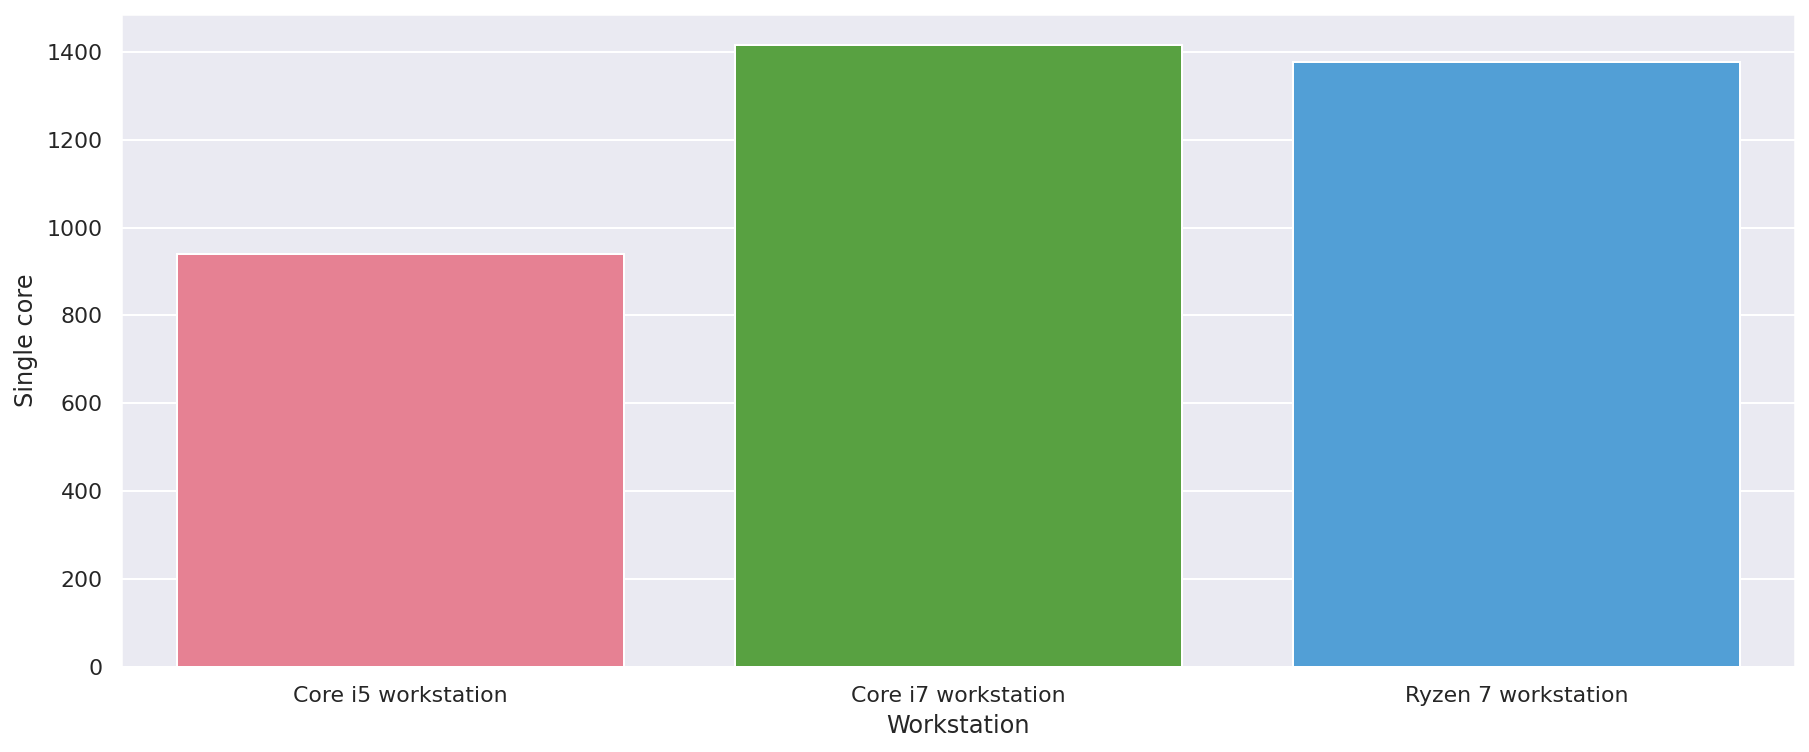
Single core benchmarks
Single core scores were pretty good. Before tweaking, the Ryzen 7 was hitting 1347 on the Geekbench 5 single core benchmark, compared to a better 1415 on the Core i7, and around 940 on my older Core i5 workstation. Overclocking the CPU only generated a small increase in the single core score, and the highest I could achieve was 1376 from a 4.3GHz 1.30V overclock.
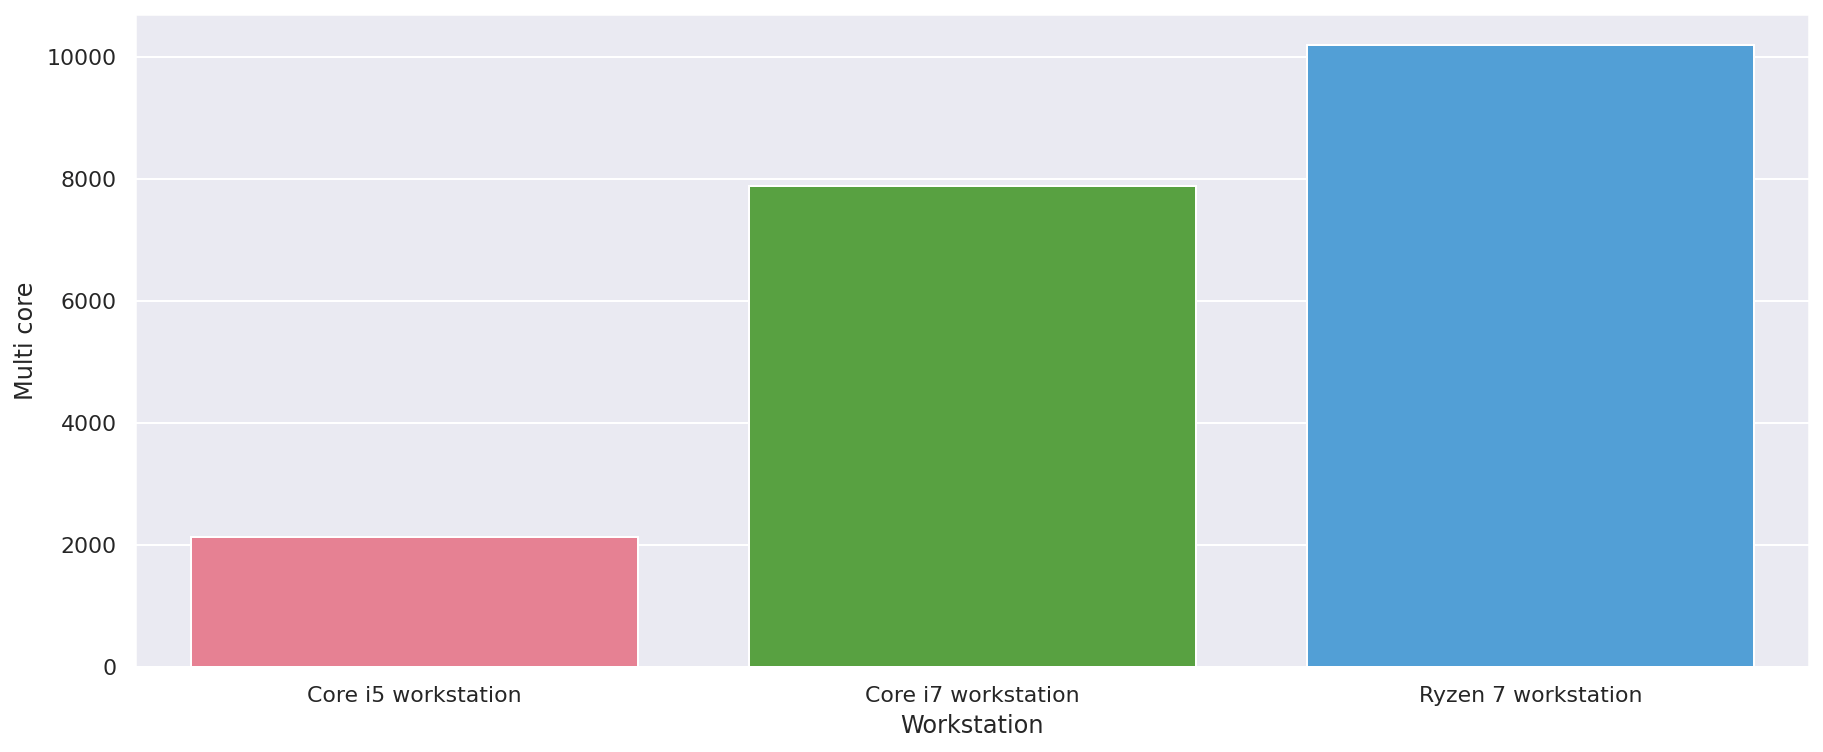
Multi core benchmarks
Multi core benchmark performance from the Ryzen 7 was better. Before any overclocking it was already achieving benchmarks of 9078 vs. the 7885 of the Core i7 machine. However, overclocking it saw this just up to an impressive 10195.
Building a workstation in 2021
If you’re planning to build your own data science workstation in 2021, you’ll have the choice of better hardware than I had access to. AMD has just released its new Ryzen 5 series CPUs, which perform extremely well, if you can find anywhere with them in stock. The Ryzen 7 5800X generates a single core Geekbench 5 score of 1659, with 10369 on the multi core score. It should obliterate my benchmarks if overclocked.
Similarly, Nvidia’s GPUs have also seen a massive performance bump recently, following the addition of the new RTX 3070 and 3080 graphics cards. Again, if you can find one, they sell for upwards of £600, but are significantly quicker than the older, more expensive models. In fact, they’re close in performance to NVIDIA’s professional V100 Tesla cards which cost around £10K. Both of these components should give you a superb workstation!
If you want to remain mobile, then there are some very powerful laptops now available that are also well-suited to machine learning and data science. I use the Dell Precision 7750 mobile data science workstation, which is powerful, very well made, but rather heavy and very expensive.
Matt Clarke, Sunday, March 07, 2021


Other posts you might like

How to use the Pandas truncate() function
Have you ever needed to chop the top or bottom off a Pandas dataframe, or extract a specific section from the middle? If so, there’s a Pandas function called truncate()...

How to use Spacy for noun phrase extraction
Noun phrase extraction is a Natural Language Processing technique that can be used to identify and extract noun phrases from text. Noun phrases are phrases that function grammatically as nouns...
