How to use Spacy for POS tagging in Pandas
Learn how to use Spacy for POS tagging in Pandas and identified Parts of Speech, stopwords, and perform lemmatization, word tokenization, and sentence tokenization.

Spacy is one of the most popular Python packages for Natural Language Processing. Alongside the Natural Language Toolkit (NLTK), Spacy provides a huge range of functionality for a wide variety of NLP tasks. It supports all common tasks out of the box, and is also highly extensible.
In this simple tutorial, we’ll use Spacy for Parts of Speech tagging (or POS tagging), and NLP text preprocessing. We’ll tokenize the words in a sentence, tokenize the sentences in a paragraph, use lemmatization, detect stopwords, and extract parts of speech and their tags to a Pandas dataframe.
Install the packages
To get started, open a Jupyter notebook and install the Spacy package via the Pip Python package management system using !pip3 install spacy. Once this is installed, you’ll need to download a Spacy model.
The most commonly used one is en_core_web_sm, but other more accurate models are available. To install this you need to execute a command line command !python3 -m spacy download en_core_web_sm and wait a couple of minutes for everything to install.
!pip3 install spacy
!python3 -m spacy download en_core_web_sm
Load the packages
Next you’ll need to import the Spacy and Pandas packages and load the Spacy en_core_web_sm model using nlp = spacy.load('en_core_web_sm'). Once that’s done, you can start using Spacy.
import spacy
import pandas as pd
nlp = spacy.load('en_core_web_sm')
Create a Spacy Doc
The first step in Spacy, after loading the model is to create a Spacy document. For this simple example, we’ll pass a string containing a couple of sentences to nlp() and return the output in a variable called doc. If you print the output of doc you’ll see that it returns the text you entered.
doc = nlp('Apple is seeking 5 new data scientists with skills in Python, Pandas, and Spacy. The roles will specialise in NLP.')
doc
Apple is seeking 5 new data scientists with skills in Python, Pandas, and Spacy. The roles will specialise in NLP.
Tokenize the words and punctuation in the document
Since Spacy and other NLP systems, such as NLTK, all work with individual words and punctuation, the initial step is to convert the elements of the document text to “tokens”. If you use a for loop to print doc you’ll get these tokens back. With a few lines of extra code, you can do the same thing but output the token.text values to a Pandas dataframe.
for token in doc:
    print(token)
Apple
is
seeking
5
new
data
scientists
with
skills
in
Python
,
Pandas
,
and
Spacy
.
The
roles
will
specialise
in
NLP
.
df = pd.DataFrame(columns=['token'])
for token in doc:
    df = df.append({'token': token.text}, ignore_index=True)
df
| token | |
|---|---|
| 0 | Apple |
| 1 | is |
| 2 | seeking |
| 3 | 5 |
| 4 | new |
| 5 | data |
| 6 | scientists |
| 7 | with |
| 8 | skills |
| 9 | in |
| 10 | Python |
| 11 | , |
| 12 | Pandas |
| 13 | , |
| 14 | and |
| 15 | Spacy |
| 16 | . |
| 17 | The |
| 18 | roles |
| 19 | will |
| 20 | specialise |
| 21 | in |
| 22 | NLP |
| 23 | . |
Tokenize the sentences in the document
Another technique that’s sometimes useful is sentence tokenization. Instead of breaking up the document into individual word and punctuation tokens, this uses the built in sents feature to break up the document into individual sentences.
for sent in doc.sents:
    print (sent)
Apple is seeking 5 new data scientists with skills in Python, Pandas, and Spacy.
The roles will specialise in NLP.
Extract Parts of Speech tags
We’ve already seen that the token returned by Spacy contains the text, such as the word, number, or punctuation, within the token.text element. However, there are a wide range of other token attributes you can also extract with Spacy. The code below will extract some of the most widely used Spacy token attributes and put them in a Pandas dataframe.
These include Parts of Speech or POS tags, stored in token.pos_, which contain a value such as NUM or NOUN to indicate what Spacy detected. They’re usually used in conjunction with token.tag_, which provides some deeper information.
You can also see things like the shape of the word (how many characters it has and what case was used), and whether the word is a commonly used stop word, such as “is”, “with”, or “in”. Stopwords rarely add much to models so often get stripped out to make models quicker and more effective.
df = pd.DataFrame(columns=['text', 'lemma', 'pos_', 'tag_', 'dep_', 'shape_', 'is_alpha', 'is_stop'])

for token in doc:
    df = df.append({'text': token.text,
                    'lemma': token.lemma_,
                    'pos_': token.pos_,
                    'tag_': token.tag_,
                    'dep_': token.dep_,
                    'shape_': token.shape_,
                    'is_stop': token.is_stop}, ignore_index=True)
df
| text | lemma | pos_ | tag_ | dep_ | shape_ | is_alpha | is_stop | |
|---|---|---|---|---|---|---|---|---|
| 0 | Apple | Apple | PROPN | NNP | nsubj | Xxxxx | True | False |
| 1 | is | be | AUX | VBZ | aux | xx | True | True |
| 2 | seeking | seek | VERB | VBG | ROOT | xxxx | True | False |
| 3 | 5 | 5 | NUM | CD | nummod | d | False | False |
| 4 | new | new | ADJ | JJ | amod | xxx | True | False |
| 5 | data | data | NOUN | NN | compound | xxxx | True | False |
| 6 | scientists | scientist | NOUN | NNS | dobj | xxxx | True | False |
| 7 | with | with | ADP | IN | prep | xxxx | True | True |
| 8 | skills | skill | NOUN | NNS | pobj | xxxx | True | False |
| 9 | in | in | ADP | IN | prep | xx | True | True |
| 10 | Python | Python | PROPN | NNP | pobj | Xxxxx | True | False |
| 11 | , | , | PUNCT | , | punct | , | False | False |
| 12 | SQL | SQL | PROPN | NNP | conj | XXX | True | False |
| 13 | , | , | PUNCT | , | punct | , | False | False |
| 14 | and | and | CCONJ | CC | cc | xxx | True | True |
| 15 | Spacy | Spacy | PROPN | NNP | conj | Xxxxx | True | False |
| 16 | . | . | PUNCT | . | punct | . | False | False |
Visualise POS tagging data with Displacy
Another neat thing you can do with Spacy is use the additional Displacy module to visualise POS tagging. The Displacy visualizer works inside a Jupyter notebook and takes the Spacy document and a style option and visualisation showing the tagged text. The ent style in Displacy labels any entities identified.
In the example below, it picks out Apple, Spacy, and NLP as ORG entities or organisations, Python as a GPE or geopolitical entity, and 5 as a CARDINAL or number. As you can see, it doesn’t always detect entities correctly when they’re a bit obscure like the ones in our text sentence. I’ll explain how you can improve and extend Spacy’s Named Entity Recognition or NER in another tutorial.
from spacy import displacy
displacy.render(doc, style="ent")

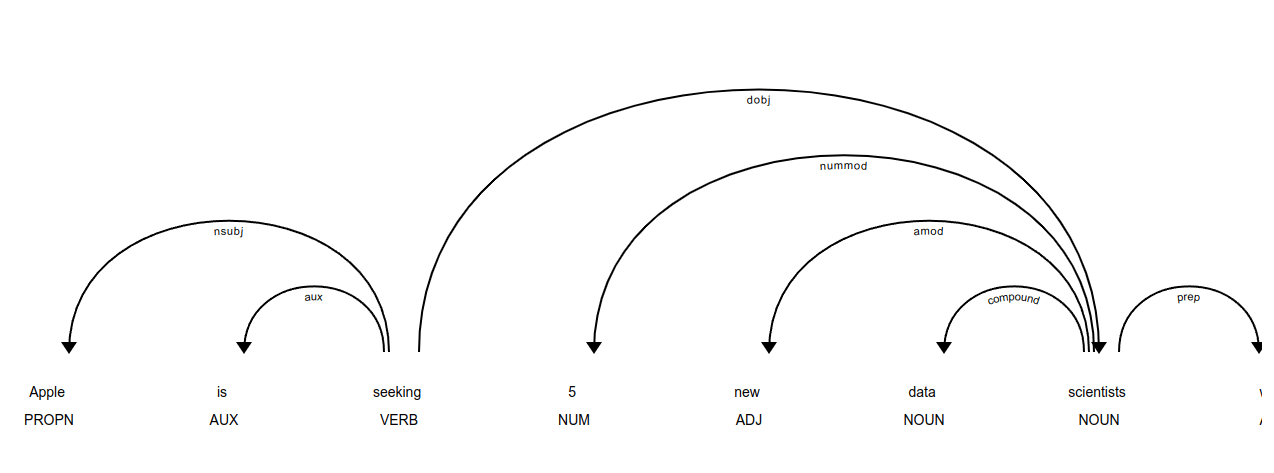
The other useful visualizer for Spacy is the Displacy dependency or dep visualizer. This shows more of the POS tagging data that the ent visualizer above, including all the Parts of Speech tags.
displacy.render(doc, style="dep", jupyter=True)
Matt Clarke, Friday, October 07, 2022


Other posts you might like

How to use the Pandas truncate() function
Have you ever needed to chop the top or bottom off a Pandas dataframe, or extract a specific section from the middle? If so, there’s a Pandas function called truncate()...

How to use Spacy for noun phrase extraction
Noun phrase extraction is a Natural Language Processing technique that can be used to identify and extract noun phrases from text. Noun phrases are phrases that function grammatically as nouns...
